
October 25, 2014
This is a post that I’ve been holding off on writing for a bit. Mainly because what I’m about to reveal (at least partially) is a family secret. That being said, the Smith Family birthday cake, as its come to be known, is a birthday tradition. It’s a bit labor intensive to make, but the finished product is so good and so worth it.
To give you a little background on the origins of this cake, it’s been around this before I was born, in fact, it came from my aunt’s mom all the way from Germany in the 1940’s. Yeah, it’s that old, and it’s stood the test of time.
Traditionally, “The Cake,” as it’s called within my family, is made only for birthdays and only for certain people. Normally it’s just my aunt, my uncle and my cousin who get it every year, but I’ve been lucky enough once or twice to receive a cake of my own for my birthday. And it’s amazing.
Here’s how I actually learned to make this cake though: my aunt’s birthday is just a week after my cousin’s and for the longest time, she would make a cake for him and then make one for herself. When my mom and I found out she was doing her own birthday cake (and two of these cakes within a week of one another), we objected and asked her to share the secret so we could make her birthday cake for her.
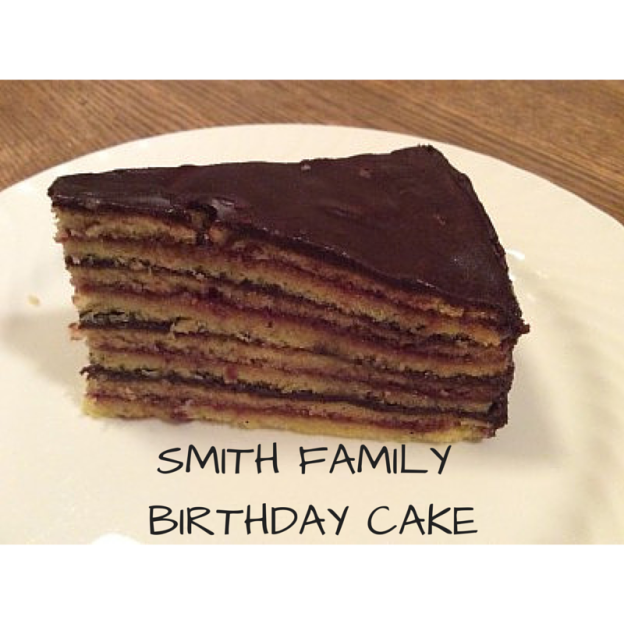
She obliged, we figured out our own tweaks to make it work best for us, and now I’ll share some of the secrets of The Smith Family Birthday Cake with you. I’ve been sworn to secrecy on the actual cake batter recipe, but a yellow cake mix will sub in nicely, and the real keys to this cake are two: 1) actual cake layers are super thin (the cake gets its height from multiple layers stacked on top of each other) and 2) make the chocolate frosting a day ahead of time to give it more time to thicken.
If you can keep those two things in mind while making this cake, it will be just as fantastic as if my aunt made it.
Smith Family Birthday Cake
Serves: 10 – 12
Ingredients:
For the cake:
- Boxed yellow cake mix (sorry, everyone, but I have to keep some family secrets secret – this cake batter will substitute fine)
For the chocolate frosting:
- 8 oz. semi-sweet baking chocolate
- 2 sticks of butter
- 7 tbsp of strong brewed coffee
For the filling:
- 1 8 oz. jar of raspberry jam (or jam flavor of choice)
Directions:
- Prepare chocolate frosting one day ahead of making cake.
- Melt semi-sweet baking chocolate in a double boiler, and melt butter in the microwave at 30 second intervals until liquid. At the same brew 7 – 8 tbsp. of very strong coffee.
- Once everything is liquid, combine the melted chocolate, melted butter and coffee in a bowl and stir until uniform. At this point, place plastic wrap over the bowl and place it in the refrigerator overnight to thicken and solidify to a more frosting-like consistency.
- On the day you’re making the cake, preheat the oven to 350 degrees Fahrenheit.
- Grease your 8 – 9 inch spring form pan bases with butter – ideally you have 3 – 4 pan bases to work with at one time.
- Prepare the yellow cake batter according to the box instructions, and using a heaping 1/3 c. of batter, spread it thin on each pan bottom till the batter is just covering the pan – right to the lip. (Each layer will be very thin, don’t worry, that’s how it’s supposed to be.)
- Bake the layers for exactly 7 minutes each – they should still be soft and not brown. If possible, bake several layers at a time to reduce the overall cooking time. The batter should be enough for 8 – 9 layers total.
- Once all the layers have been baked and cooled, stack them alternating between a layer of raspberry filling and layer of chocolate frosting until the top of the cake is reached.
- Ice the cake all over with the remaining chocolate frosting, let set (it will harden a little once it’s done), and you’re all set for with the best birthday cake around!

This cake’s a bit labor intensive to make, but that makes the wonderful combo of flavors even more satisfying when you first bite into it.

Mmm…
