August 24, 2014
Fried chicken is as American as apple pie. Unfortunately, the traditional method of cooking it is also fairly hazardous to your health. Between pressure cookers, frying oil and big chunks of breaded chicken (thighs, wings and all), fried chicken has never been mistaken for ‘health food.’ Today, that will change, with this post.
Yes, my friends, no joke: healthy fried chicken. Impossible, you say? Not anymore. With just a few simple tweaks to the colonel’s original recipe, you can avoid the possible self-injury from household objects and the deep-fried-ness all at the same time. Plus, this chicken still comes out delicious!
It’s juicy on the inside, crunchy on the outside, and some might even say it tastes better than the original. My boyfriend, highly allergic to anything that attempts to healthy-up classic recipes even likes this recipe – he actually requests it and gets excited when I make it.
It doesn’t take a lot of time and effort to put together and the reward is well-worth it. So if you’re ready for the secret to some great buttermilk oven-fried chicken, see my recipe below.
Buttermilk Fried Chicken
Serves: 6
Ingredients:
- 1/4 c. low-fat buttermilk (or sub in 2% milk)
- 4 tsp. Dijon mustard (I prefer Grey Poupon)
- 1 tbsp. honey
- 6 boneless, skinless chicken breasts (about 2 lbs.)
- 1 tsp. paprika
- 1/2 tsp Tony Chachere’s Creole Seasoning (for a little extra zing)
- 1/2 tsp. salt, 1/2 tsp. pepper
- 3/4 c. panko bread crumbs (I prefer Kikkoman Panko Bread Crumbs – they’re the lightest and crispiest)
- 2 tbsp. canola oil
Directions:
- Combine buttermilk, mustard and honey in a large zip-top plastic bag.
- Add chicken breasts and let them marinade from 30 minutes up to 2 hours in the refrigerator to soak up the flavor.
- Preheat oven to 350 degrees.
- Remove the chicken from the bag, placing on wax paper or aluminum foil, and discard the leftover marinade.
- Sprinkle the chicken breasts with paprika, Tony’s, salt and pepper evenly on both sides.
- Dredge each piece in breadcrumbs to coat.
- Meanwhile, heat 1 tbsp. of oil in a large skillet over medium-high heat, and add the chicken (I can usually fit three breasts at a time) and cook 3 minutes per side. Add the second tbsp. of oil to cook the second batch of chicken to prevent it sticking to the bottom of the pan.
- Transfer chicken to a wire rack in a rimmed baking sheet with aluminum foil underneath for easier cleanup.
- Bake 25 – 30 minutes or until cooked through.
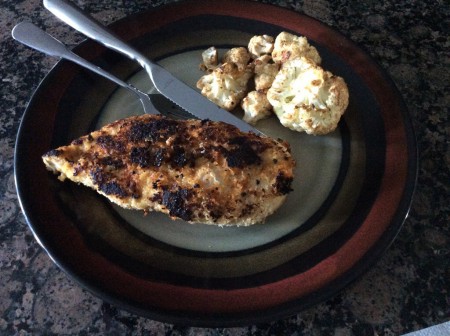
- Let cool 3 minutes and serve alongside veggies or pasta (I made balsamic roasted cauliflower this time). Enjoy!

This piece of chicken got a little too browned in the skillet, but trust me, it still tastes fantastic in your mouth.


